Sea Glass Christmas Tree
*A picture frame craft that's sure to dazzle*
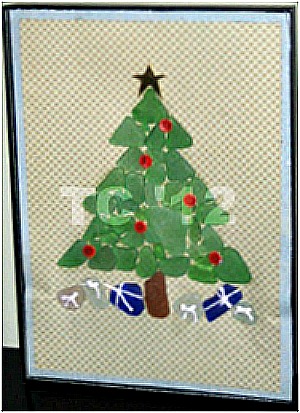
Look at this Sea Glass Christmas Tree wall hanging. It would look spectacular wherever you displayed it. You can certainly add some sparkle to your holiday decor with this easy Christmas craft.
Would you like to learn how I made it? Well let's get started...
I found the picture frame for a cheap price at a bargain store, my daughter has tons of scrapbook paper that I raided, and I have collected sea glass for years.
I had everything right at my fingertips just waiting to be made into something beautiful and decorative. So I 'lit a fire under my butt' and got crafting!
This Sea Glass Christmas Tree was inspired by some gorgeous crafts I saw this summer at the PEI Beach Glass Festival.
Materials:
- 5 X 7 picture frame
- 2 different pieces of scrapbook paper
- scissors
- glue
- pencil
- a bunch of green sea glass
- 1piece of brown sea glass
- various other colors of sea glass
- thick thread
- Christmas tree template
- red polka dots
- star sticker
Instructions:
1. Choose two different pieces of scrapbook paper that you feel compliment one another and your project.
2. Take the glass out of your frame and measure and cut each piece of scrapbook paper so that it fits perfectly in the frame. Note that in my craft I made my scrapbook paper different sizes.
3. Position the two pieces of scrapbook paper so that they are lying the way you want them to look in your frame, then glue the two pieces together.
4. Take these glued together scrapbook pieces and glue them to a piece of light cardboard that fits your frame. I did this to add some support to the paper.
5. Take your Christmas tree template and position it where you want it on your scrapbook paper and then trace it.
6. Grab your green sea glass and start gluing it to fill in the Christmas tree shape. You will probably have to play with the positioning of the sea glass a little bit to find pieces that fit well together.
7. Glue your piece of brown sea glass at the bottom of your tree, trying to center it as best you can.
8. Take various colors of sea glass and glue them onto the scrapbook paper under the Christmas tree.
9. Decorate these to make them look like presents.
10. I had some red polka dots that were the centers of punchy flowers. I took these red polka dots and glued them onto the Christmas tree to make them look like Christmas tree decorations.
11. Stick your star sticker at the top of your Christmas tree.
12. Now place your decorated scrapbook paper in your frame and then insert the glass over that.
You are done! Admire the stunning picture frame art you have created and then hang it on your wall with pride.
Here are some other craft ideas you might like.
Just click on the picture to view the craft.
|
Home ← Picture Frame Art ← Sea Glass Christmas Tree |


New! Comments
Have your say about what you just read! Leave me a comment in the box below.